一、安装vue环境
已有的可以跳过
npm i vue -g
npm i vue-cli -g

二、创建一个vue项目
vue create .
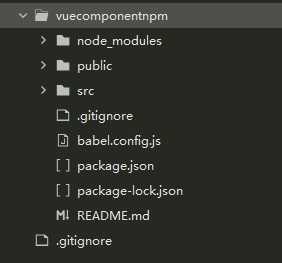
文件目录如下图:
三、调整目录
1、packages
增加一个packages目录,用来存放我们的组件模块。
2、examples
修改原来的src目录为examples,用于运行展示代码。
3、文件调整
(1)vue.config.js
修改项目入口
const path = require('path')
function resolve(dir) {
 return path.join(__dirname, dir)
}
module.exports = {
 // 修改 src 为 examples
 pages: {
  // lintOnSave: false,
  index: {
   entry: "examples/main.js",
   template: "public/index.html",
   filename: "index.html"
  }
 },
 // 组件样式内联
 css: {
  extract: false
 },
 // 扩展 webpack 配置,使 packages 加入编译
 chainWebpack: config => {
  config.resolve.alias
   .set('@', resolve('examples'))
   .set('~', resolve('packages'))
 }
};
四、将组件代码放到packages目录中
完整组件目录如下
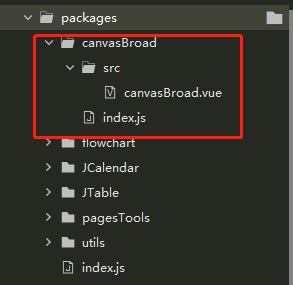
红圈为一个组件的完整目录,每一个组件都应该有这样的目录。
这里以一个手写画板组件为例来给大家展示一下。
1、canvasBroad.vue
<template>
 <div id="canvas-broad">
   <canvas id="canvas" :width="width" :height="height">浏览器不支持canvas<!-- 如果不支持会显示这段文字 --></canvas>
   <j-tab-bar v-if="toolsTabList"
    :tabList="tabList"
    :showTab="showTab">
   <template v-slot:back-ground-color>
    <div class="section">
      <span class="info">设置背景颜色:</span>
     <input class="btn input-color" type="color" v-model="brackGroudColor" />
    </div>
   </template>
   <template v-slot:pen-color>
    <div class="section">
      <span class="info">选择画笔颜色:</span>
     <input class="btn input-color" type="color" v-model="penColor" />
    </div>
   </template>
   <template v-slot:eraser>
    <div class="section">
      <span class="info">选择橡皮擦:</span>
      <button class="btn colorBtn" :style="'background-color:' + brackGroudColor + ';'" @click='setPenColor();'>{{brackGroudColor}}</button>
    </div>
    <div class="section">
     <button class="btn" @click="setBackGround()">清空画布</button>
    </div>
   </template>
   <template v-slot:pen-size>
    <div class="section">
     <span class="info">选择画笔大小:</span>
     <progress :value="progressValue"
       style="cursor: pointer;"
       id="progress"
       max="1"
       :title="progressValue * 100 +'%'"
       @click="setPenWidth">
     </progress>
     <span style="margin-left: 0.3125rem;">{{20 * progressValue}}px</span>
    </div>
   </template>
   <template v-slot:export>
    <div class="section">
     <span class="info">输出画板内容到下面的图片:</span>
     <button class="btn" @click="createImage();">EXPORT</button>
    </div>
    <img id="image_png">
   </template>
  </j-tab-bar>
  <template v-if="!toolsTabList">
   <div class="section">
    <button class="btn" @click="setBackGround()">清空画布</button>
   </div>
   <div class="section">
    <span class="info">选择画笔颜色:</span>
    <input class="input-color" type="color" v-model="penColor" />
   </div>
   <div class="section">
    <span class="info">设置背景颜色:</span>
    <input class="input-color" type="color" v-model="brackGroudColor" />
   </div>
   <div class="section">
    <span class="info">选择橡皮擦:</span>
    <button class="btn colorBtn" :style="'background-color:' + brackGroudColor + ';'" @click='setPenColor();'>{{brackGroudColor}}</button>
   </div>
   <div class="section">
    <span class="info">选择画笔大小:</span>
    <progress :value="progressValue"
      style="cursor: pointer;"
      id="progress"
      max="1"
      :title="progressValue * 100 +'%'"
      @click="setPenWidth">
    </progress>
    <span style="margin-left: 0.3125rem;">{{20 * progressValue}}px</span>
   </div>
   <div class="section">
    <span class="info">输出画板内容到下面的图片:</span>
    <button class="btn" @click="createImage();">EXPORT</button>
   </div>
   <img id="image_png">
  </template>
 </div>
</template>
<script>
 import JTabBar from '../../pagesTools/JTabBar.vue';
 export default{
  name:'canvasBroad',
  props:{
   height:{
    type:Number,
    default:-1
   },
   width:{
    type:Number,
    default:-1
   },
   defaultPenColor:{
    type:String,
    default:'#000000'
   },
   defaultPenSize:{
    type:Number,
    default:4
   },
   defaultBackGroundColor:{
    type:String,
    default:"#ffffff"
   },
   toolsTabList:{
    type:Boolean,
    default:false
   }
  },
  components:{
   JTabBar
  },
  watch:{
   brackGroudColor:{
    handler(newVal,oldVal){
     this.setBackGround();
    }
   }
  },
  data() {
   return{
    penColor:"#000000",
    penWidth:4,
    penClick:false,
    startAxisX:0,
    startAxisY:0,
    brackGroudColor:"#ffffff",
    progressValue:0.2,
    tabList:[{
     label:'背景颜色',
     id:'back-ground-color'
    },{
     label:'画笔颜色',
     id:'pen-color'
    },{
     label:'橡皮擦',
     id:'eraser'
    },{
     label:'画笔大小',
     id:'pen-size'
    },{
     label:'导出图片',
     id:'export'
    }],
    showTab:0
   }
  },
  created(){

  },
  mounted() {
   this.init();
  },
  methods:{
   //页面初始化
   init(){
    let height = this.height;
    let width = this.width;
    if(width == -1){
     const cbw = document.getElementById('canvas-broad');
     width = cbw.offsetWidth * 0.9;
     height = cbw.offsetHeight * 0.6;
     this.width = width;
     this.height = height;
    }
    this.penColor = this.defaultPenColor;
    this.brackGroudColor = this.defaultBackGroundColor;
    this.penWidth = this.defaultPenSize;

    let canvas = document.getElementById('canvas'); //获取canvas标签
    let ctx = canvas.getContext("2d");//创建 context 对象
    ctx.fillStyle = this.brackGroudColor;//画布背景色
    ctx.fillRect(0,0,width,height);//在画布上绘制 width * height 的矩形,从左上角开始 (0,0)
    canvas.addEventListener("mousemove",this.drawing); //鼠标移动事件
    canvas.addEventListener("mousedown",this.penDown); //鼠标按下事件
    canvas.addEventListener("mouseup",this.penUp); //鼠标弹起事件
   },
   getWidthSelect(width){
    if(width == this.penWidth){
     return "btn bg penBtn fw"
    }
    return "btn bg penBtn"
   },
   getColorSelect(color){
    if(color == this.penColor){
     return 'btn colorBtn fw'
    }
    return 'btn colorBtn';
   },
   setBackGround(){
    const canvas = document.getElementById('canvas'); //获取canvas标签
    const ctx = canvas.getContext("2d");//创建 context 对象
    ctx.fillStyle = this.brackGroudColor;//画布背景色
    ctx.fillRect(0,0,this.width,this.height);//在画布上绘制 600x300 的矩形,从左上角开始 (0,0)
   },
   setPenWidth(event){
    const progress = document.getElementById('progress');
    this.progressValue = (event.pageX - progress.offsetLeft) / progress.offsetWidth;
    this.penWidth = 20 * this.progressValue;
   },
   //设置画笔颜色
   setPenColor(color = ''){
    if(color == '') this.penColor = this.brackGroudColor;
     else this.penColor = color;
   },
   penDown(event){
     this.penClick = true;
     this.startAxisX = event.pageX;
     this.startAxisY = event.pageY;
   },
   penUp(){
     this.penClick = false;
   },
   drawing(event){
     if(!this.penClick) return;
    const canvas = document.getElementById('canvas'); //获取canvas标签
    const ctx = canvas.getContext("2d");//创建 contextconst canvas = document.getElementById('canvas'); 对象
     const stopAxisX = event.pageX;
     const stopAxisY = event.pageY;
    const left = document.getElementById('leftMenu');
    const lw = left && left.offsetWidth ? (left.offsetWidth || 0) / 2 : 0;
     ctx.beginPath();
     //由于整体设置了水平居中,因此需要做特殊处理:window.screen.availWidth/2 -300
    const wsaW = window.screen.availWidth;
    const cl = canvas.offsetLeft;
    const ct = canvas.offsetTop;
     ctx.moveTo(this.startAxisX-cl,this.startAxisY - ct);//moveTo(x,y) 定义线条开始坐标
     ctx.lineTo(stopAxisX-cl,stopAxisY - ct );//lineTo(x,y) 定义线条结束坐标
     ctx.strokeStyle = this.penColor;
     ctx.lineWidth = this.penWidth;
     ctx.lineCap = "round";
     ctx.stroke();// stroke() 方法来绘制线条
     this.startAxisX = stopAxisX;
     this.startAxisY = stopAxisY;
   },
   createImage() {
    console.log('-------');
    const canvas = document.getElementById('canvas'); //获取canvas标签
     const img_png_src = canvas.toDataURL("image/png"); //将画板保存为图片格式的函数
     // console.log('=====',img_png_src);//data:image/png;base64,iVBOR.....
     document.getElementById("image_png").src = img_png_src;
   }
  }
 }
</script>
<style lang="scss" scoped="scoped">
 *{
   margin: 0;
   padding: 0;
 }
 #canvas-broad{
   margin: 0 auto;
   /*text-align: center;*/
 }
 #canvas{
   border: 2px solid #ff6700;
   cursor:crosshair;
   /*不能用这种方式给canvas设置宽高*/
   /*width: 600px;*/
   /*height: 300px;*/
 }
 .btn{
   width:70px;
   height: 40px;
   border-radius: 10px;
   border: 1px solid #aaa;/*去掉<button>默认边框*/
   outline:none;/*去掉<button>选中时的默认边框*/
  cursor: pointer;
 }
 .input-color{
   width:70px;
   height: 40px;
   border-radius: 10px;
   border: 0;/*去掉<button>默认边框*/
   outline:none;/*去掉<button>选中时的默认边框*/
 }
 #image_png{
   width: 300px;
   height: 150px;
   border: 2px solid #ff6700;
   display: block;
   margin: 10px auto;
  }
 .section{
   margin-top: 10px;
 }
 .info{
   color: #f0f;
   font-size: 14px;
   line-height: 40px;
 }
 .bg{
   background: #ff6700;
 }
 .fw{
   font-weight: 700;
 }
</style>
2、canvasBroad/index.js
import canvasBroad from './src/canvasBroad.vue';
canvasBroad.install = Vue => Vue.component(canvasBroad.name, canvasBroad);//注册组件
export default canvasBroad
3、packages/index.js
import canvasBroad from './canvasBroad'
// 存储组件列表
const components = [
 canvasBroad
]
// 定义 install 方法,接收 Vue 作为参数。如果使用 use 注册插件,则所有的组件都将被注册
const install = function (Vue) {

// 判断是否安装
if (install.installed) return
 // 遍历注册全局组件
 components.map(component => Vue.component(component.name, component))
}
// 判断是否是直接引入文件
if (typeof window !== 'undefined' && window.Vue) {
 install(window.Vue)
}
export default {
 // 导出的对象必须具有 install,才能被 Vue.use() 方法安装
 install,
 // 以下是具体的组件列表
 ...components
}
五、测试组件
1、main.js引入组件
import jvuewhell from './../packages/index'
// 注册组件库
Vue.use(jvuewhell)
2、在App.vue中使用组件
<canvasBroad :toolsTabList="true"></canvasBroad>
六、上传到npm
测试通过了之后也就到了最后的一步,将我们的组件上传到npm库上去。
1、package.json
加上:“lib”: “vue-cli-service build --target lib --name jvuewhell --dest lib packages/index.js”
填写好基本信息
"name": "@jyeontu/jvuewhell",
 "version": "0.1.0",
 "author": "JYeontu",
 "license": "MIT",
 "description":"vue组件库封装",
 "main": "lib/jvuewhell.umd.min.js",
 "keyword": "vue components",
"scripts": {
  "serve": "vue-cli-service serve",
  "build": "vue-cli-service build",
  "lint": "vue-cli-service lint",
 "lib": "vue-cli-service build --target lib --name jvuewhell --dest lib packages/index.js"
 },
2、打包
npm run lib
设置.npmignore,只上传我们需要的文件
examples/
packages/
public/
3、登录npm
在cmd中输入命令 npm login(注意不要使用其他源)
npm login
需要先注册账号,没有的可以先去官网注册,npm官网
4、发布
npm publish
因为我的name为’@jyeontu/jvuewhell’,所以需要使用下面命令
npm publish --access public
发布成功之后就可以上自己的npm库里查看了。